

NOT ANYMORE, I HAVE A BLADEMASTER DEPUTY WITH A THEURGE FORGED SWORD
10 Likes
Belatedly: it is definitely intended to be difficult to get anything but routed while maintaining 0 violence.
I’d actually like to write some X-lands interaction with Ciels focused on ${his} mourning – and some interaction for an arrogant aristo MC. So I think I’ll hold off on punishing the MC here.
No, thanks so much for the catch. There are a couple of things going on here – not just making sure the Wiends are inwoods rather than helcamp, but making sure the x4 modifier for literate outlaws isn’t applied to them. Their literacy isn’t totally useless for infiltration support, but it’s not nearly as helpful as having literate infiltrators out in the Rim proper.
So in addition to the +30 that reflects their own limited value-added, I’ll add a line *set helcamp +((literate-22)*4) if Korszata’s there, to make sure the impact of literate non-Wiends still gets applied. And then at helcampcheck I’ll put a 43 ceiling rather than 21 if the Wiends are with you, so a lit-maxing run doesn’t end up sending Wiendish infiltrators through the backdoor.
Does that sound like it should work, or am I missing something?
If the journey were painless, I’d have done something wrong.
It would be a fun scene, but I don’t think Calea would risk doing it just for the symbolism. She’s not your friend in any possible scenario, after all.
Good catch, again – thanks. Pretty sure that code is a legacy of a time before I’d added the hypocrite variable. Much easier to use that, as you suggest.
I’ll push an update shortly with the fixes above.
8 Likes
Hmm, well, it’s not immediate consequences, but I imagine going to the Xaos Lands with Ciels after you killed ${his} (didn’t know Ciels had variable gender) lover will be punishing in its own way. I’ll take it.
Oh I see what you mean now and why Korszata only gives +30 shayardenes in the camps. Well, I won’t be getting as many of my outlaws into the camps this way, but, that just means more followers for De Firiac to lead with his theurge forged sword.
![]() I understand
I understand
I’m looking forward to playing a Hypocrite. Compassionate is a useful reputation to have but can bring problems if you’re too soft to do what’s needed.
5 Likes
I have a 2 CHA 1 COM arrogant skeptical ruthless homelander aristo who pretends to be devout and declares themselves Elect. That’s a lot of fun. My “power at any cost” character.
6 Likes
I’m proud of you Cotton. You are strong.
3 Likes
There’s one thing that puzzles me. If the enemies are not very numerous, and the build is COM 2, max traps, it is possible to kill more soldiers than those actually present.
4 Likes
That’s an interesting one. I’d never actually looked at the traps code in the winter before. I’d assumed that it’s a 1:1 conversion from followers sent to traps, but that’s not how it works at all.
It’s roughly this:
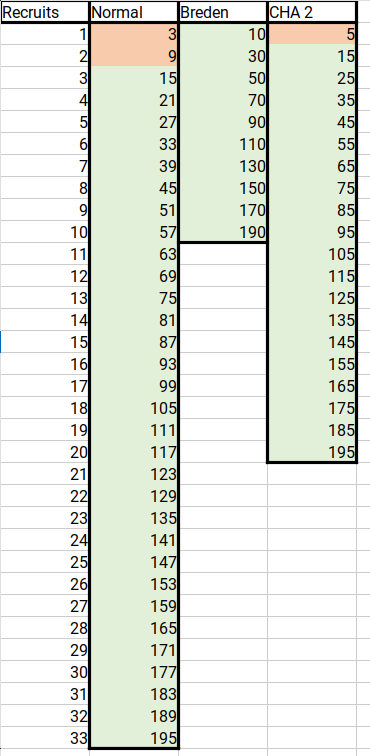
You send between 10 and 50 outlaws to add traps per week. If there are kids present that number is doubled. So each week you can have up to 100 “outlaws” placing traps. The number of “outlaws” sent is then converted into traps at a proportion of 1/3 until there are 50 traps set. After there are 50 traps set, that proportion is dropped to 1/5. So, if you managed to somehow send the maximum number of followers every week and have children in the camp, you can end up with 33x2+20x8=226 traps by the end of winter. If you’re COM 2, the number of traps is then doubled, so you can max out at 452 traps, if my maths is right.
Traps only target Alastors, troops sent by the nobles, and then, if there are more traps set than the total number of Alastors and noble troops added together, phalangites. Assuming there are less than 452 Alastors and noble troops, you kill approximately 150 of all three groups at maximum deployment. That will always completely wipe out the Alastors, and, unless you’ve completely tanked your noble rep, will probably wipe out the noble troops too. It’s implausible that you’ll be able to get below 150 phalangites at the start of Chapter 4, so you almost certainly can’t wipe them out with just the traps at max deployment, but if you’ve minimised your notoriety, I think it should be possible to have killed literally all of the attacking troops before you get to High Crag.
6 Likes
I still fondly remember one point where, when I did a popularity-maximizing run, I managed to completely army-wipe the Phalangite main force before they even reached the nonexistent traps.
Alas, it was a bug and Havie patched it. It would have been a highly amusing easter egg if it was possible for the attack in Chapter 4 to fail under the weight of logistical difficulties before they ever reached you.
14 Likes
That’s not as hard as you might be imagining, kinda had to do it for that whole tagmasword rout thing. Also, send just 24 the first week, it’ll be 16+33×2+20×7=222 traps, and surely you’re not gonna spend 26 outlaws in a week for just 4 more traps.
That would indeed be highly amusing. The army arrives and it’s comprises of Aletheia de Arquin, Hector Keriatou, Captain Tychon, 2 theurges…
And literally no one else.
7 Likes
I also noticed that enemy army size isn’t taken into account when calculating casualties when you choose to harry them instead of starting a forest fire. Not sure if that should count as a bug.
The game no longer stockpiles Alastor and Noble estate casualties, which might make alternative high anarchy strategies more effective.
1 Like


2 COM 1 CHA are my favorite starting stats. Anyways, here’s a guide, even if in reality the run wasn’t so difficult.
TagmaSword Rout
Prologue: Doesn’t matter much, just take into consideration we’re doing Skeptic Cosmopolitan, and compassionate reputation. I personally chose to save Hiera Olynna
Chapter 1: Take a Karagond name and a de Shayarin last name we can sacrifice for Aristo and Cosmopolitan rep.
When meeting Breden, don’t be arrogant if you’re truthfully compassionate or you won’t have enough to calm down your helots when winter starts. Always say the first thing you hate most is the superstitious nonsense of the Ecclesiasts, and then either the treatment of the helots or the lack of ruthlessness of the Hegemony if you’re going hypocrite (like me)
Join Breden’s seditious group, showing them your great skill in Pygmachia (don’t teach them combat tactics yet) and your, not so great skill in reasoning. At least you can read.
Promise to Breden you’ll rebel when the opportunity arises.
When the fourth harrowing starts, don’t let anyone die and start by calling out the harrowing as an affront to the angels and the hegemony a blaspheming murderer (just to anger the priests) and then charge at the Alastors without fear.
Once the Harrower’s broken, do not let the angry mob kill everyone, yet, put the Alastors on trial for their crimes to maintain order, and reveal your skepticism to all.
Once that’s done, we’ll target the new faction we’re making ourselves enemies of, by sacking the market, taking 8 mules and some drachems without casualties.
And now to the winter…
Chapter 2: Ok, here’s what we’ll be doing on every winter week. Stealing from helots (take note of how many times), Trapping, recruiting, and literacy teaching. Put 24 traps on week 1, 50 in every other week, refer to the table for recruiting and use Breden whenever available
Teach every outlaw left (and leave at least 2 every week) to read and write
Anyways, onto the specifics:
Week 1:
Set up healthy rations for sick and subsistence for healthy, 0 mules for the sick
Prepare to steal a lot of mules, send scouts to steal from the hegemony, try and get lucky begging yourself from mules of the yeomanry before betraying them and sending 40 outlaws to steal from both the merchants and yeomanry
Send 7 outlaws and all the mules to take grain from the helots
And then, as stated above, traps, recruiting, and literacy teaching
Week 2:
Use your high compassionate reputation to calm down your outlaws, and set up healthy rations for all.
This week is simple, just send 20 outlaws to steal from the merchants, rob the helots, traps, recruiting and teaching
Week 3:
A busy one. Start by scouting for more opportunities to steal mules from the hegemony, and then send 50 outlaws to steal the ones you’ve already scouted.
Lead the raid yourself with Elery Skinner, and invite the dregs to join your rebellion
Once the others come back, ask Breden to reassure them
Steal grain from helots once more, and only after doing that, give the sick the mules they need, and keep up to date with that. Now, traps, recruiting, and teaching.
Week 4:
Fedrel will give us an early start, but, we’ll be merciful and just exile him. -4 anarchy is very good when you want De Firiac to come.
Anyways, onto the actual week, from here on out, only raid the helots if the difference between your current rations and the amount you need is more than 57. If it’s less, selling a mule to just buy the grain will be much cheaper in the long run.
Other than that, specific to this week we’ll start scouting for temples to rob, and then ask Elery how to rob the architelone.
Obviously agree to the plan, kill the guards, DO NOT KILL A CHILD and agree to pin it all on Alaine Leybridge. Not like she likes us very much after all the mules we stole.
Anyways, after that, back to the usual, traps, recruiting and teaching.
Week 5:
Get your grain
Steal some more mules from Ecclesiasts and back again
Traps, recruiting and teaching
Week 6:
Grain
Lead the temple raid alongside Breden, and after that, scout for more temples to rob. We’ll find it in week 10.
Traps, Recruitment, Teaching
Week 7 to 9:
Just follow the usual strategy of this run until the Architelone raid shows up, then bring everyone you can, send them after the merchant, spare everyone and invite them to join your revolt.
Once you meet up with Bleys, ask him to join your rebellion, after all, you have enough friends, and once back in camp make sure him and his family find a welcome.
On week 10, lead the last raid of the winter on a temple of Xthonos, and then, back at it, trapping, recruitment, and no teaching because there’s no teaching in week 10.
Also some things I forgot of previous weeks, don’t make your band’s symbol a gryphon, and don’t make decisions by moot. Apella is fine, but you can reach the cosmopolitan bonus without it. Anyways!
Sell all the mules you can
Pay 1200 drachems to the yeomanry
Your helot rep is approximately 150-(helot grain raids×55) It’ll probably be negative, but that’s what bribes are for. The first 100 points cost 800 drachems, after which, it’s 50 drachems per point, so, run the numbers with that and try to give them a big enough bribe that you end up with 200 positive helot rep
After that, get Sybla to train your outlaws (don’t bother buying more weapons) and make a feast, just to show off, and start a relationship with Breden, just don’t try to prove his loyalty or you risk him fleeing the band.
You should have exactly 20 anarchy, so when De Firiac comes, welcome them with open arms
Finally, change your name to end in tou, so you inspire Phalangites to join your rebellion.
Chapter 3:
Don’t bother with Horion and Linos, just send Breden to bring them to you (kill them) while you explore high crag
Don’t even bother with religion, it’ll only anger your followers
When hector comes killing your outlaws, choose to be gay for hector, but without daring to risk your reputation so you can setup a rendez-vous with him. When Calea shows up instead, approach, listen to her, and ask her to tell you everything of Hector’s Veneurs, to prepare your counter ambush.
Prepare the plan to massacre Hector’s Veneurs, inviting De Firiac to the planning tent, and going yourself as part of the bait. Once the veneurs arrive, try keeping them at a distance, throwing a Javelin at a veneur, and then taunt Hector with your inevitable victory as the arrows fall down on the Veneurs.
You’ll get told you killed them all, which will bring about 46 more armed followers, on top of Korszata, Ethena, and the compassionate bonus. Now you’re ready to face an army.
Chapter 4:
And one is coming. Choose to split up and send your followers back to the rim, we’ll still have about an army worth of followers in the woods, so make sure they’re all armed.
If you have money leftover (you better) spend 800 drachems on helots 1200 on yeomen to become a folk hero
As part of the preparations, marry Breden, a high price for a Kryptast code, but we need it.
When Calea’s info comes, if you’re facing 359 Phalangites or less, we should be good.
Once the battle starts, start harrying the army from the woods. All the traps we setup in the winter will kill all the nobles, Alastors, and I think 148 phalangites.
For the next part, attack only the theurges, bringing their numbers down to 1 and, now the painful part.
Once it’s time to thread the needle, try to sneak away at night. Unfortunately, you have too big an army for this to succeed, and a third of your followers will die trying to run away. But, there is a positive, with 2 COM and all our outlaws armed, we can fight back against the phalangites, further bringing down their numbers so we can break them ourselves when the time comes.
But, for now, you’re routed, and you arrive back again at high crag. If you want to kill Breden, send your followers with Zvad until only 50 remain with you, otherwise, send all you can with Breden.
After the preparations and dealing (or not) with the poisoning, you’ll kill a Plektos and it’s theurge, and then, rally your outlaws to face the Phalangites.
Don’t lead the charge yourself, hold back and order them to shore up defenses, but they’re too few to succeed, and get routed.
With a bit of luck, the army will have enough morale left to encircle you all properly, so when you find them, ask to make an accounting.
After accountings are made, kill them all, without mercy, until they’re the first to break, and you can rescue whatever followers you have left.
You all barely survived, but you routed their army yourself, and can give De Firiac the theurge forged sword to lead your remaining followers, while you travel to Xaos with Ciels.
8 Likes
@Havenstone If you do the accounting escape and either successfully rescue the captives or rout the army, then the trial of Breden, Earnn and Gaved never triggers, even if you said you were going to deal with it later at the time of the poisoning. Is that intended?
2 Likes
If anyone’s interested, here’s a helot high anarchy (2 COM 1 CHA) version of the accounting rout - with text stolen liberally from maximo’s aristo strategy. You keep the helots, yeomanry and priests on side while absolutely tanking your noble and merchant reps. It works by carefully selecting raids such that the number of Phalangites either decreases or only marginally increases because they cause enough chaos to offset how much they anger the authorities.
Run strategy
We’re going for ruthless/devout/nationalist (mainly because I thought that fit the character rather than for any mechanical reasons). You can probably eek a bit more out of this in terms of optimisation. I was just trying to get it to work rather than absolutely minmax.
Prologue:
Any is fine, as long as you don’t get any cosmopolitan points. I personally think the Olynna prologue works best narratively here though.
Chapter 1:
Take devout as your primary motivation and ruthless as your second. We want to be able to get the morale boost early in Chapter 2, and we need high ruthlessness by the end of week one for that. Go to the meeting with the helots. Be kind of Alless, we’re going to keep Radmar on side. Get 2 COM 1 CHA. Lunge at the alastors at the Harrowing, and then make a brutal example of the authorities. We want as much anarchy as we can get, without getting too much notoriety. Plunder the nobles for 11 mules and some cash, then run into the woods. Tell Breden you don’t trust her, for some more Radmar rep.
Chapter 2:
We’re going to broadly follow the same arc as maximo for things we’re doing every week here. Put 24 traps on week 1, 50 in every other week, refer to maximo’s table for recruiting (from both the helots and yeomanry) and use Breden every time. Twice, when you have less than 30 bandits remaining, send Breden begging for mules, rather than using them for recruiting, use Radmar instead, if he’s available (we’re building him up remember). There’s some randomness on when exactly that will be, but it will most likely be weeks 2 and 3. That’ll get you 3 extra mules in exchange for 2 recruitment. A good trade.
The ideal weeks for the theurge attacks are 4 and 7, but we’re robust to whenever they hit, at the cost of recruitment.
Go after rabbits with everyone left over after recruiting to the nearest breakpoint your remaining outlaws.
Make Zvad your deputy to keep your Radmar rep.
Make Shayarin the tongue of the rebellion.
Precise details:
Week 1:
Set up healthy rations for sick and 3/4 for healthy, 0 mules for the sick.
Buy the maximum amount of grain.
Scout for mules, and a noble estate to raid.
Beg for mules with the MC.
Steal mules from the merchants (track the number you’ve stolen).
Use 4 outlaws to hunt for rabbits to hit your food goal.
Traps.
Recruit.
Eat healthy rations yourself (to reduce RNG).
Week 2:
Use ruthlessness for calming your outlaws.
Sell 1 mule, buy as much grain as you can afford.
Change rations to subsistence for healthy children.
MC beg for mules again.
Steal mules from the merchants (again, track the number you’ve stolen, if you’ve been lucky with the RNG and the total is now 11 or higher, we’ll be doing some extra stuff in either weeks 9 and 10 or just 10).
Traps.
Recruit.
Week 3:
Set up a moot, we need those nationalism points.
Sell 1 mule, buy as much grain as you can afford.
Raid the alastors for mules with Elery. Follow her plan. Recruit the drudges.
Traps.
Recruit.
Week 4:
Make a brutal example of Fedrel. The only punishment for treachery in our rebellion is death. Check on Poric for even more Radmar relationship.
Change rations to subsistence to all healthy and healthy to all sick. We’re going to keep this for as long as possible. If you get to a week where RNG as been cruel, drop down that week to make sure you can get the traps out, then put the rations back up the next week.
Sell 1 mule, buy 36 bushels.
Set mules for the sick for the number Terret asks for plus 3 (as the recruiting we’re about to do is going to raise the number he needs).
Raid the noble estate with you leading. Bring Radmar. Climb up. Fight on the roof. Make it look like you burnt the nobles in their beds, and then the horses too for food. Take the helots with you. Don’t mention any names to Zvad.
Beg with the MC. I guess because you’re already travelling that way, you can do both.
Traps.
Recruit.
Week 5:
If you were found by the theurge last week:
Set mules on Terret to 0.
Raid a noble grain store, MC leading. Target one who embraced Karagond culture. Burn the barn. Send all your mules.
If you weren’t found by the theurge last week:
Sell 1 mule, buy 52 bushels.
Correct mules on Terret to what he currently needs.
MC beg for mules.
In both cases:
Scout another noble estate.
Traps.
Recruit.
Week 6:
If you were found by the theurge two weeks ago:
Buy 52 grain.
MC beg for mules.
If you were found by the theurge last week:
Set mules on Terret to 0.
Raid a noble grain store, MC leading. Target one who embraced Karagond culture. Burn the barn. Send all your mules.
If you haven’t been found by the theurge yet:
Correct mules on Terret to what he currently needs.
Raid a noble grain store, MC leading. Target one who embraced Karagond culture. Burn the barn. Send all available mules.
In all cases:
Scout market town.
Traps.
Recruit.
Week 7:
Buy 52 bushels. You have to be careful here. Don’t send more mules on the run than Terret would have needed last week plus two.
Correct mules on Terret to what he currently needs.
MC beg for mules.
Scout alastor garrison.
Traps.
Recruit.
Week 8:
Let the band pick your symbol.
If you were found by the theurge last week:
Buy 52 bushels.
Set mules on Terret to 0.
Raid another noble estate. MC leading. Kill the nobles.
If you weren’t found by the theurge last week:
Buy 52 bushels.
Correct mules on Terret to what he currently needs.
Raid another noble estate. Radmar leading, this is more efficient for the anarchy/notoriety trade off, for some reason.
In both cases:
Traps.
Recruit.
Week 9:
If you were found by the theurge two weeks ago:
Buy 52 grain.
Raid the alastor garrison. MC leading bring Radmar. Steal treasure and food.
If you were found by the theurge last week:
Set mules on Terret to 0.
Raid the alastor garrison. MC leading bring Radmar. Steal treasure and food.
If you haven’t been found by the theurge yet:
Correct mules on Terret to what he currently needs.
Raid the alastor garrison. MC leading bring Radmar. Steal treasure and food.
In all cases:
If you have stolen exactly 11 mules from the merchants thus far, raid the merchants for mules. Pay Alaine off.
Traps.
Recruit.
Week 10:
Buy food if necessary.
Set mules on Terret to 0.
Raid a market town. Pay Alaine off if required.
If you have stolen more than 12 mules from the merchants thus far, raid the merchants for mules. You won’t get any, but you’ll get some cash and a nice free +4 anarchy.
Traps.
Recruit.
Afterwards:
Sell mules down to 15. We want to minimise casualties.
Get Sybla to train your outlaws.
Hire a Daikon. Give him good quality food. Pay him.
Say the rebellion is focused on Shayard.
Start a relationship with Breden.
Don’t test them.
Chapter 3:
Go and see Horion and Linos. Point arrows at them. Stop K from killing them. Bring them back to the camp.
Let the moot decide to ransom them.
Treat them as badly as possible and use menacing interrogator voice.
Ask everything. Make sure you say “The vision of a free Shayard will bring together all Shayardenes as one.” to Linos after saying “Until a rebellion succeeds”, and “I won’t stop until Shayard is free from Rim to Coast.” to Horion. That should be enough to get Bethune to join you. Your brutal treatment of Horion is enough to get him to reveal the existence of Cerlota out of fear. Tell Linos you’d only accept Electhood if three priests agreed. Keep Horion for ransom. Send Linos off if you want to (I did).
Incite the Brecklanders to steal the sheep. Bring K and Breden. Kill the early shephards. Say that they don’t have to kill their fellow Brecklanders the second time to recruit Terth and some yeoman next chapter.
Travel back as a group, hope you get lucky with RNG.
Chapter 4:
At the moot get Breden and Joana to speak.
Choose to split up and send your followers back to the Rim.
Release Horion. We can’t deal with the impact of killing him.
Accept Terth when he arrives.
Sell the rest of your mules.
Spend 1000 drachems on helots, 2000 on yeomen and 6000 on priests.
Pay for spies.
If you can afford it, by weapons up to the number who are still in the woods.
Save any money left over.
Marry Breden to get the code. Tell her it’s a dangerous thing to admit knowing.
We then basically follow maximo’s strat, with only a few changes:
Start harrying the army from the woods.
For the next part, attack only the theurges using a mad plan. Stone them.
Try to sneak away at night.
If you want to kill Breden, send your followers with Elery (to save her in the poisoning) until only 63 remain with you, otherwise, until only 40 remain with Breden.
Rally your outlaws to face the Phalangites.
Lead the charge against the Phalangites.
Ask to make an accounting.
After accountings are made, kill them all, without mercy, until they’re the first to break, and you can rescue whatever followers you have left.
Leave someone in charge with your shiny new sword and go off to the Xaoslands with a gamgee. I went with Bethune in charge and K with me into the Xaoslands.
9 Likes
Between the context – “Your situation scarcely bears thinking about. You’ve many gravely injured rebels, with no food, and you don’t dare make a fire of any size.” – and the fact that Breden’s secret had let you successfully kill the Tagmatarch, I thought it was OK to not try to work in a revised version of the poisoning trial before you flee across the Ward.
7 Likes
Just played through again for the first time in a while, mind sharing what each of the ending options you listed out here is? I forgot how much I enjoyed this game and now I want to try to get them all lol
3 Likes
It was quite a long time ago so I may have forgotten some things from that plus good/bad axis is completely arbitrary on my part, not even mentioning that over these 5 years since the post my opinions certainly changed a bit.
From top to down, starting from left side:
- High anarchy rebellion destroyed in battle
- Low anarchy rebellion destroyed in battle
- Rebellion destroyed as well but also the one that alienated the society by becoming ordinary bandits (so low rel with all factions), at least thats what I think I meant
- Supposed timeline where MC died at some point before Chapter 1, before Rim Square rebellion even began
Okay, next columns.
- Ruthless sect with intent of vengeance on (most) other classes, such as nobility, merchants and priesthood, plus any kind of victory
- Successful evasion ending with high anarchy
- MC death at the end on otherwise quite successful rebellion run
- Any kind of rebellion victory but the rebels turned into ordinary looters, bandits
- Successful run with Kenon cult
- Ordinary combat victory, but with big losses - essentialy “wonfight 9” variable from game code
- Successful eclect escape/infiltration
- Bandit rebellion victory that seeks to make amends with their robbed victims, something akin to rebellions that repay yeomen in winter after raiding them
- Pacifist infiltration victory
- Well, decisive combat victory (wonfight 10) plus some inner voice flavor, not much thought beyond that from what I recall
- Victory with high reputation with all social classes
- Flawless escape of quite successful rebellion in chapter 4
4 Likes